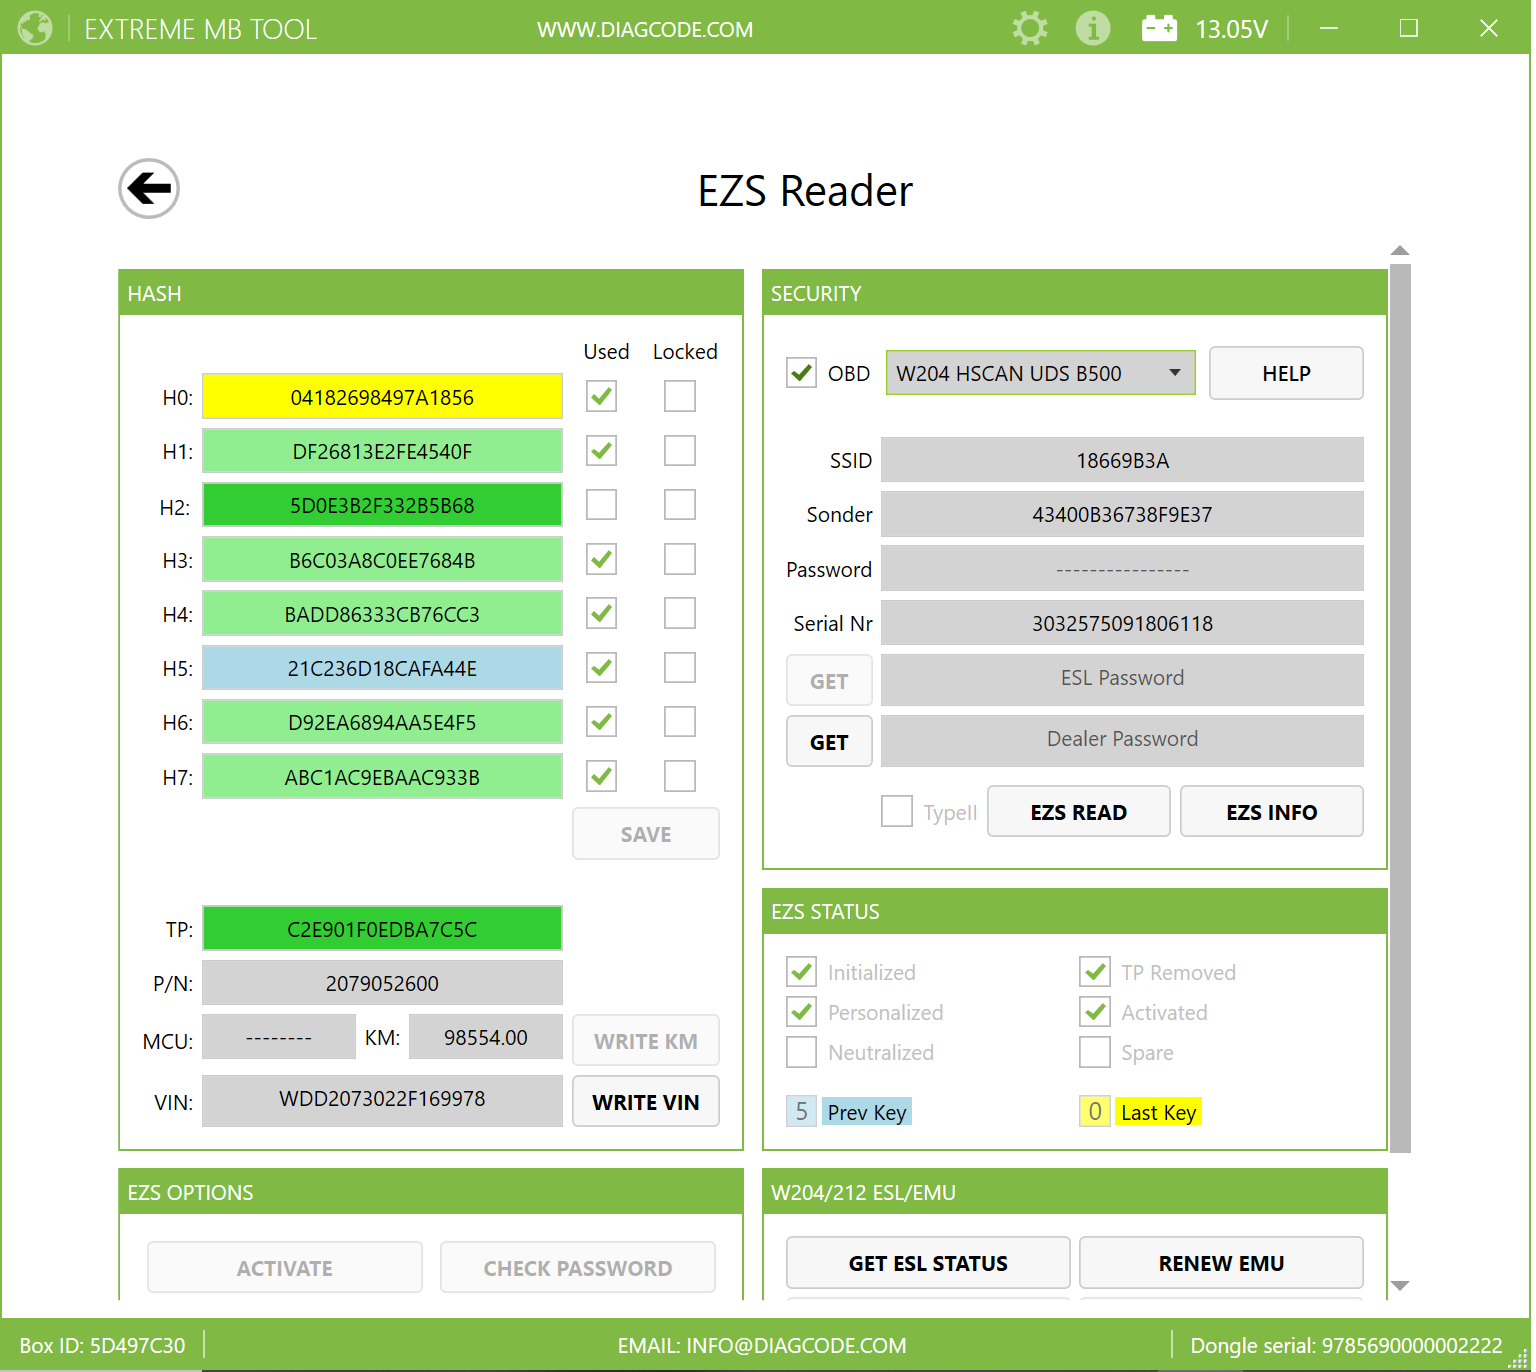
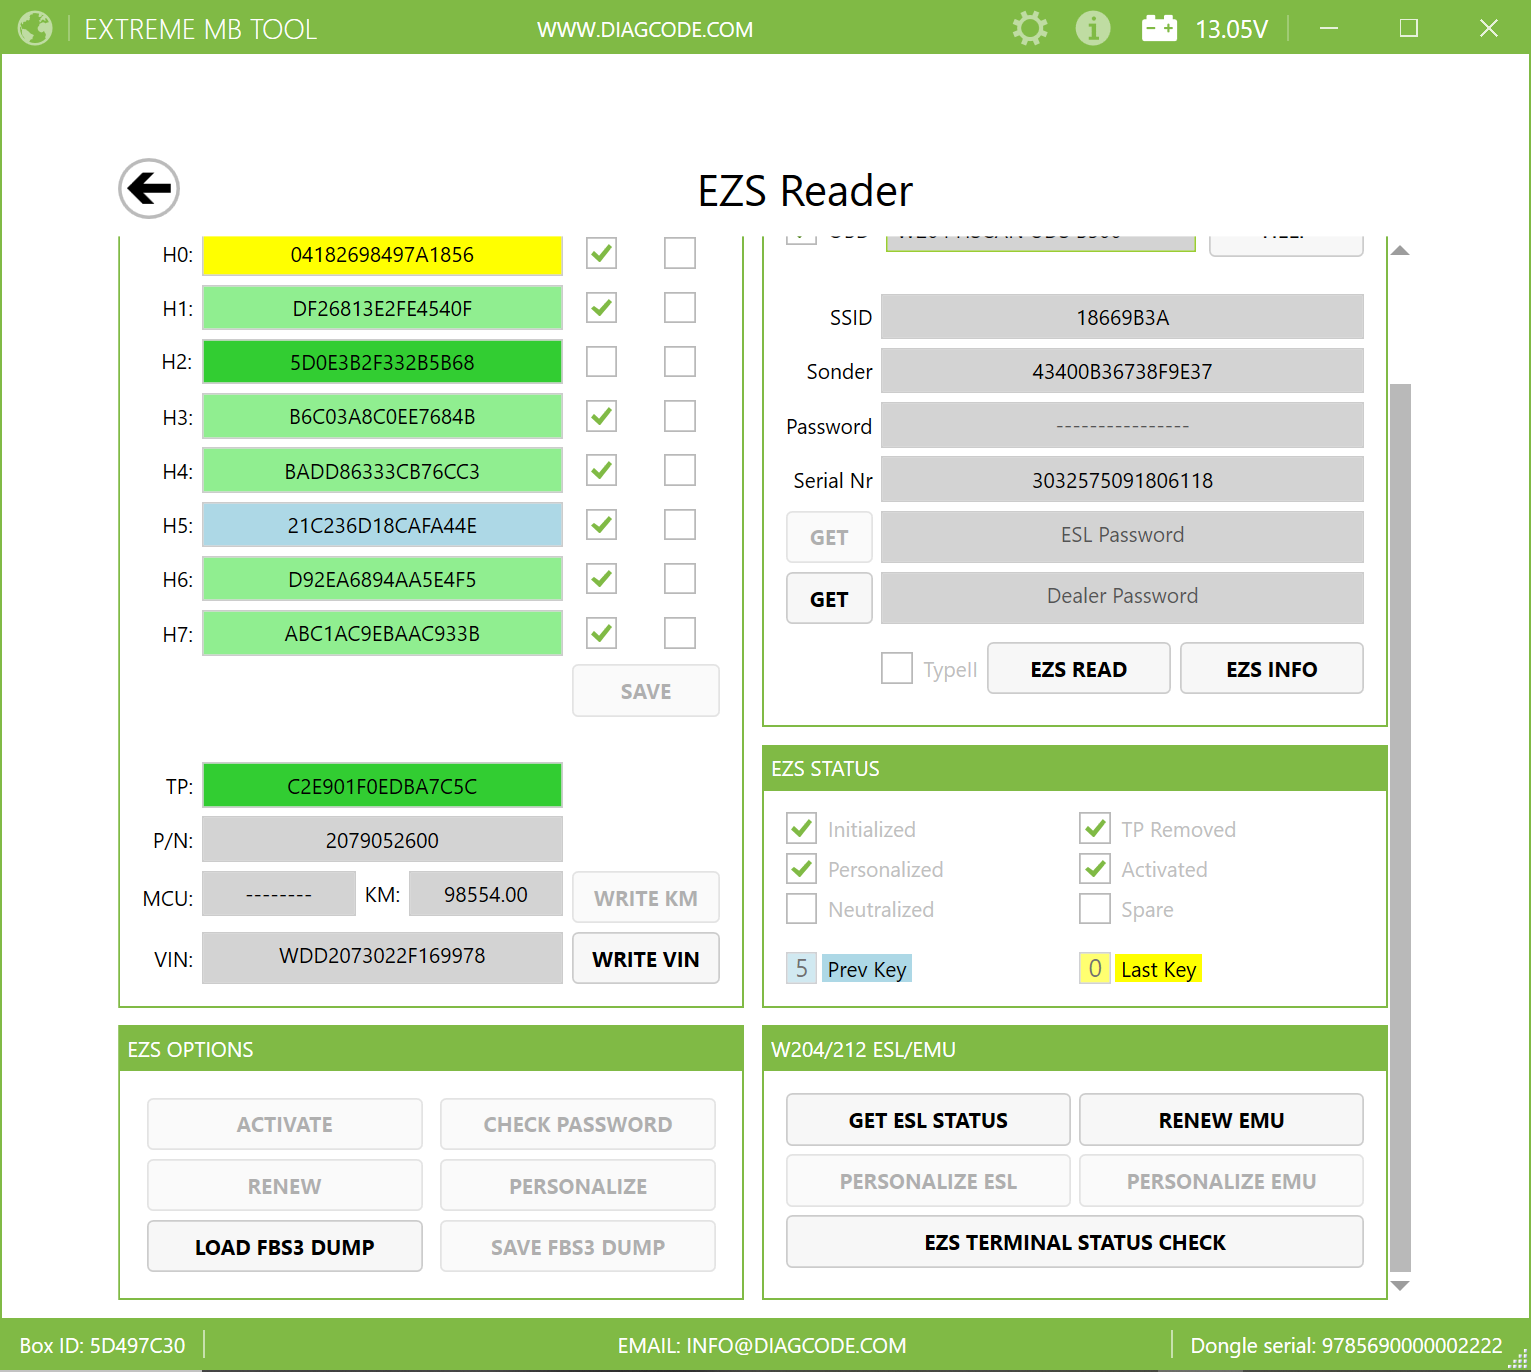
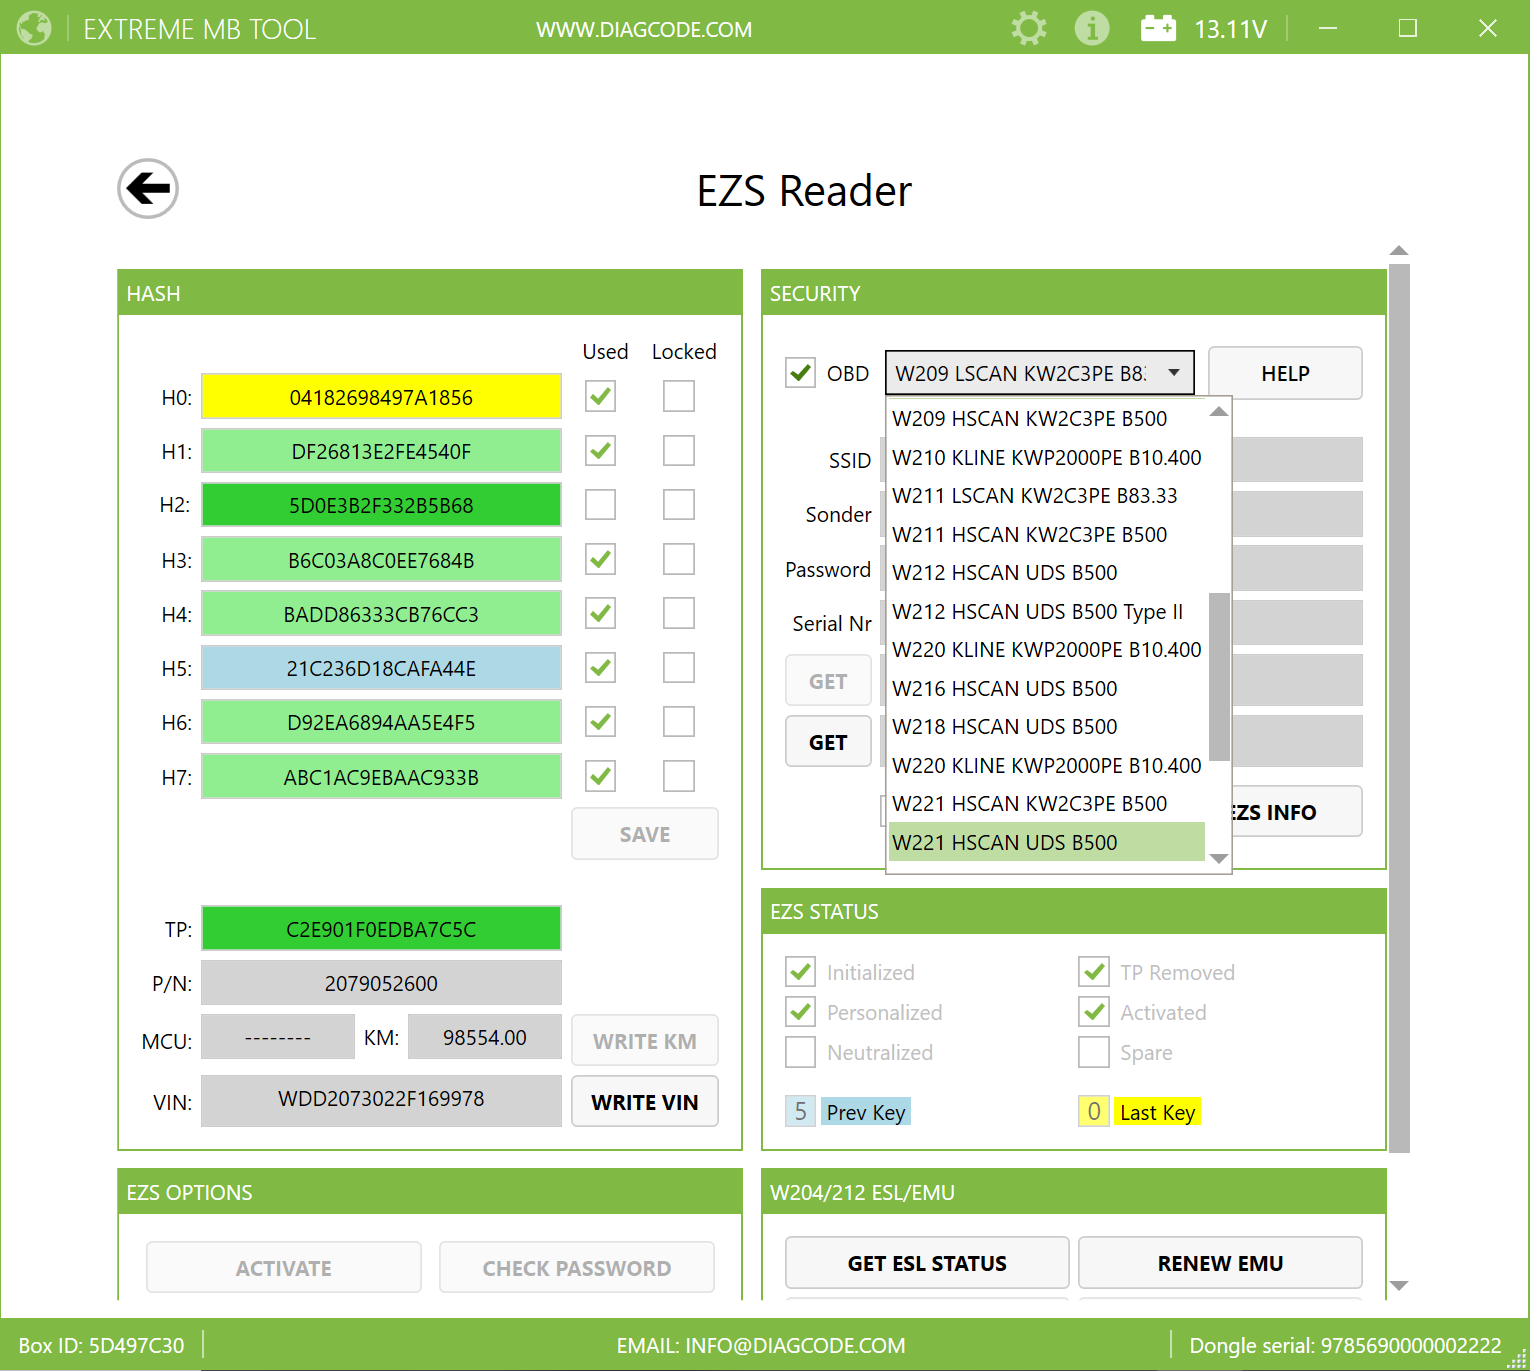
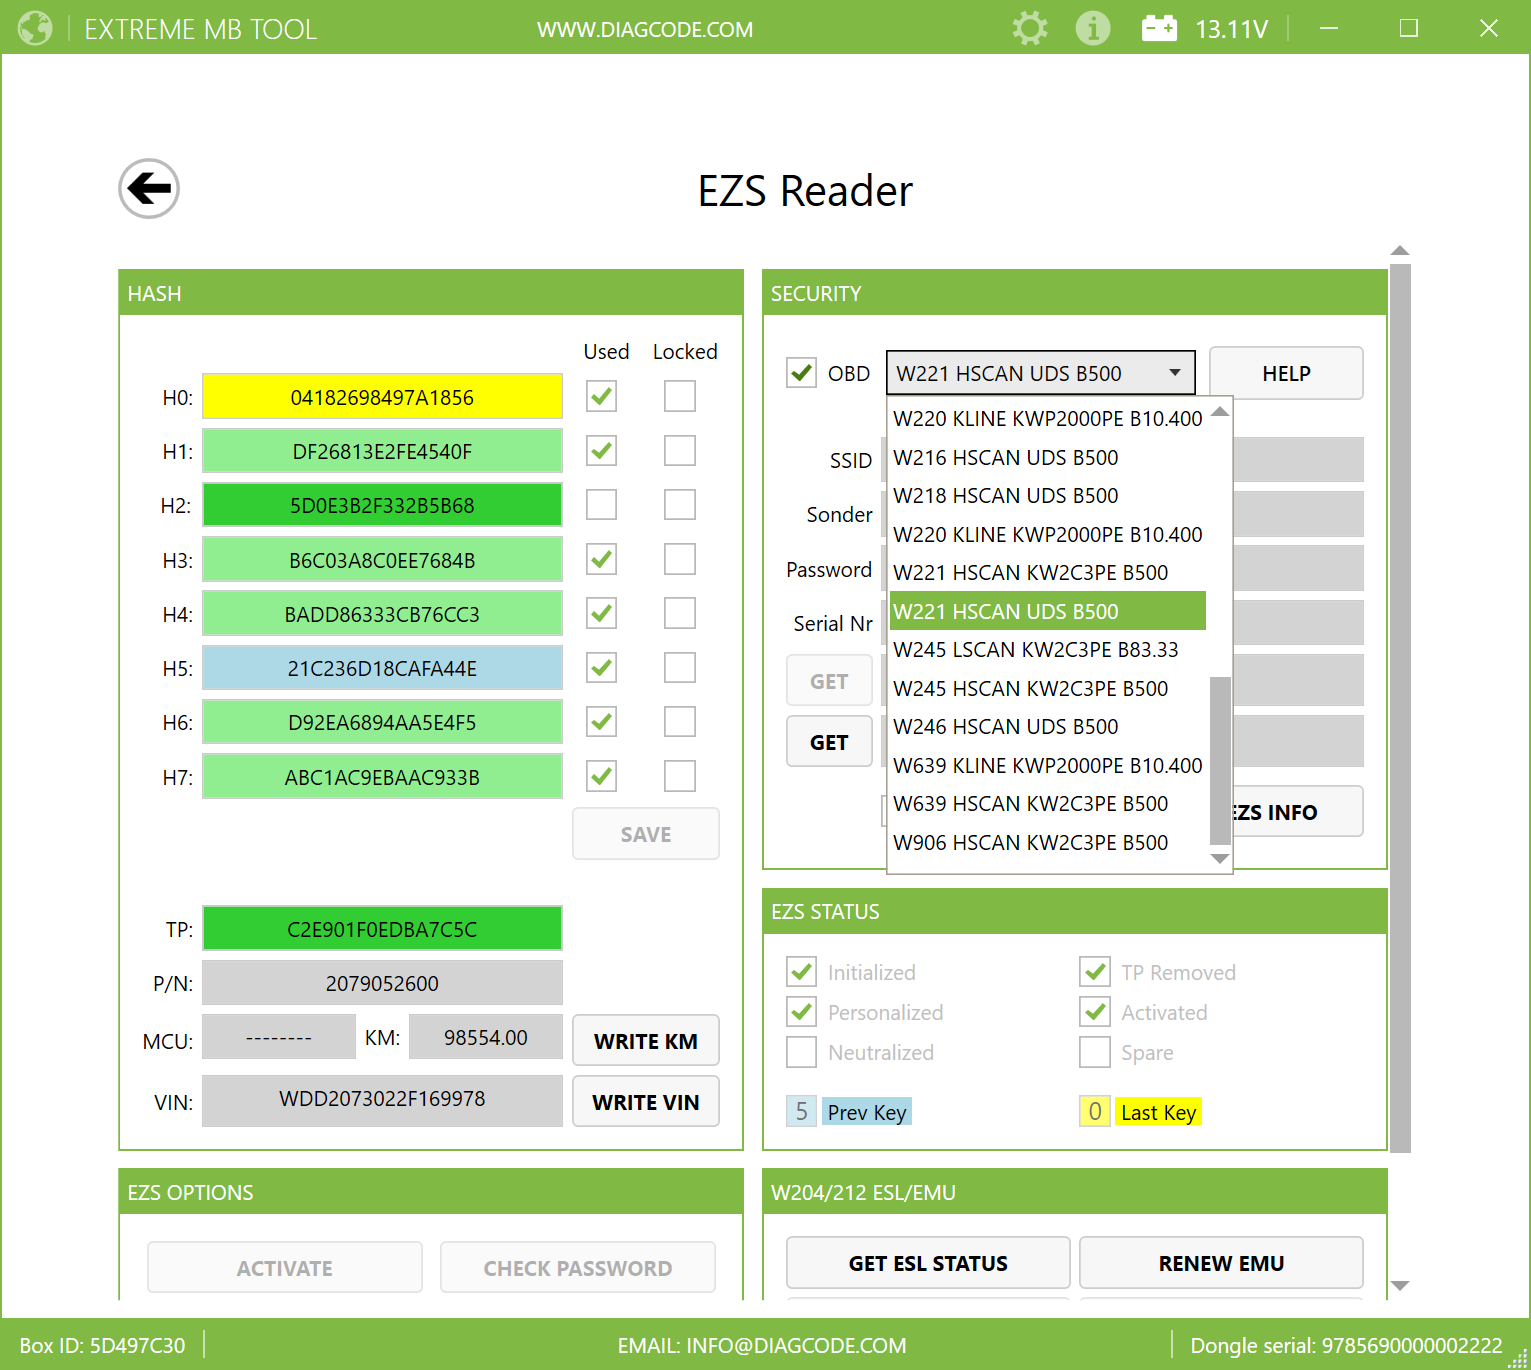
Solutions you can not find elsewhere


            Extreme MB Tools


  • ExtremeIr5.jpg
  • ExtremeIr3.jpg
  • ExtremeIr6.jpg
  • ExtremeIr1.jpg
  • Power Adapter web.jpg
  • Open Port 2.0 web.jpg
  • EZS Cables to connect on desk web.jpg


Extreme MB Tools


We would like to present you our new and convenient product for all current and future customers. We have done this for all of you to make it easier and more convenient for you. We also added a lot of new things. All this is absolutely free for current customers who already have our product.


  • The world's first intuitive tool for Mercedes
  • NO TOKENS
  • 100% success for password calculation
  • Support for adapting a Donor EZS when old one is faulty, broken or missing (Easily retrieve Original Hashes from ECU on bench, on car’s fitted with ESL there is no need to remove ESL, data is collected via diagnostic connector with fitted EZS in car)
  • Hash Reading via the OBD Socket in-vehicle, eliminating the need to remove the ECU
  • Supports EZS Reading via IR / K-line and Canbus protocols
  • Supports EZS VIN writing via OBD ( Only works on EZS that are NOT ACTIVATED )
  • Supports Read and Write KMs via OBD ( W164 UDS and W221/216 UDS protocols )
  • EZS / ESL Test Platform + ESL Emulation function
  • EZS / ESL wiring connections at the click of a button

  • All OEM Workshop Key Protocols incorporated
  • The only tool in the world that can Successfully Personalize and Activate a Renewed FBS3 ESL from - W176/117/246/156
  • 100% safe to use
  • User Friendly Interface
  • You do not need to have additional knowledge
  • All in one software


We release new updates very often and all our software have automatic updates. Thus you can be sure you are always using the latest version of the app.


Here you can see the latest news regarding software updates: https://www.diagcode.com/embt/release/


From this link you can download the software : https://diagcode.com/downloads/SetupExtremeMBTool.exe


IR TOOL KEY DATA ACQUISITION

With this option you can read a list of data from the working key and then load it to our server to calculate the Keys Password. There is also an option " Security Check "  You can use this option to verify the correct password

1. KEY INFO Section:

READ Button -> Read info from Key such as SSID, Status, Life and Firmware

Key ID -> Displays Keys SSID

Status ->  Displays Status of the Key

FW -> Displays the Firmware version of the Key

Distance - > Displays Hex value corresponding to the Keys Life Counter 

Life -> Displays the Keys Life counter. Actual number Of remaining times key will be operational


2. DATA ACQUISITION Section:

GET DATA Button -> Read the data from a working key that is then used to calculate the Key/EZS Password

EZS Hash -> Current Hash Stored inside EZS for the Key that we are currently working with

Total Hash -> The number of Hashes extracted from the Working Key ( 1 list contains 1024 )


3. SECURITY CHECK Section:

CHECK PASSWORD Button -> Check if the Password is a match with the Key inserted in IR Programmer

Key password -> This field is where the user can insert the Password to be verified with the Key inserted in IR Programmer

Security Hash -> When the correct Password is entered in the Password field, then the “HASH” field will display the actual real decoded Hash being sent from the Key


4. ONLINE DATA ACQUISITION CALCULATOR STATUS Section:

Status ->  Displays the current state of the Online Calculation
Key Password -> This field is where the Found Password will displayed


IR TOOL EZS READER

With this option the User can Read the Data from the EZS via the IR Portal, the user can also Edit the EZS Data and Save to file or they can use the Data to Personalize another EZS. We also have functionality to Lock and Unlock Key Tracks, Renew the EZS, Activate the EZS and Verify the EZS Password.  There are also options here to work with the ESL and ESL Emulators that are common on the W204/212/176 Cars ...

1. HASH Section: 

From H0 to H7 are the actual current key hashes for each Keys position

Used or Locked positions -> “Used” is occupied key position and “Locked” is a Locked key position, also known as “Disabled Key Track” Locked Key Track Hash will be displayed in RED Color.


TP = Transport Protection Release Hash

P/N = EZS Part Number

MCU = Micro Controller type inside EZS ( Not all EZS support this option )

KM = Total Mileage currently stored inside EZS

WRITE KM = Used to write New Mileage Value to EZS (Only works on W164 UDS and W221/216 UDS protocols)

VIN = Vehicle Identification Number / Chassis Number currently stored inside EZS

WRITE VIN = Used to write New VIN to EZS ( Only works on EZS that are NOT ACTIVATED )


2. SECURITY  Section: 

This field displays the SSID, Sonder and Serial number of the EZS. Also it has a field to paste the “Password” We have added a useful function into the new software that will automatically paste a Found Password into the Password field. The User will also notice inside this Security field that we have 2 Buttons " GET "   These buttons are used to Calculate the ESL Password and the Dealer Password directly from the EZS Reader panel, no need to copy / paste anymore ....

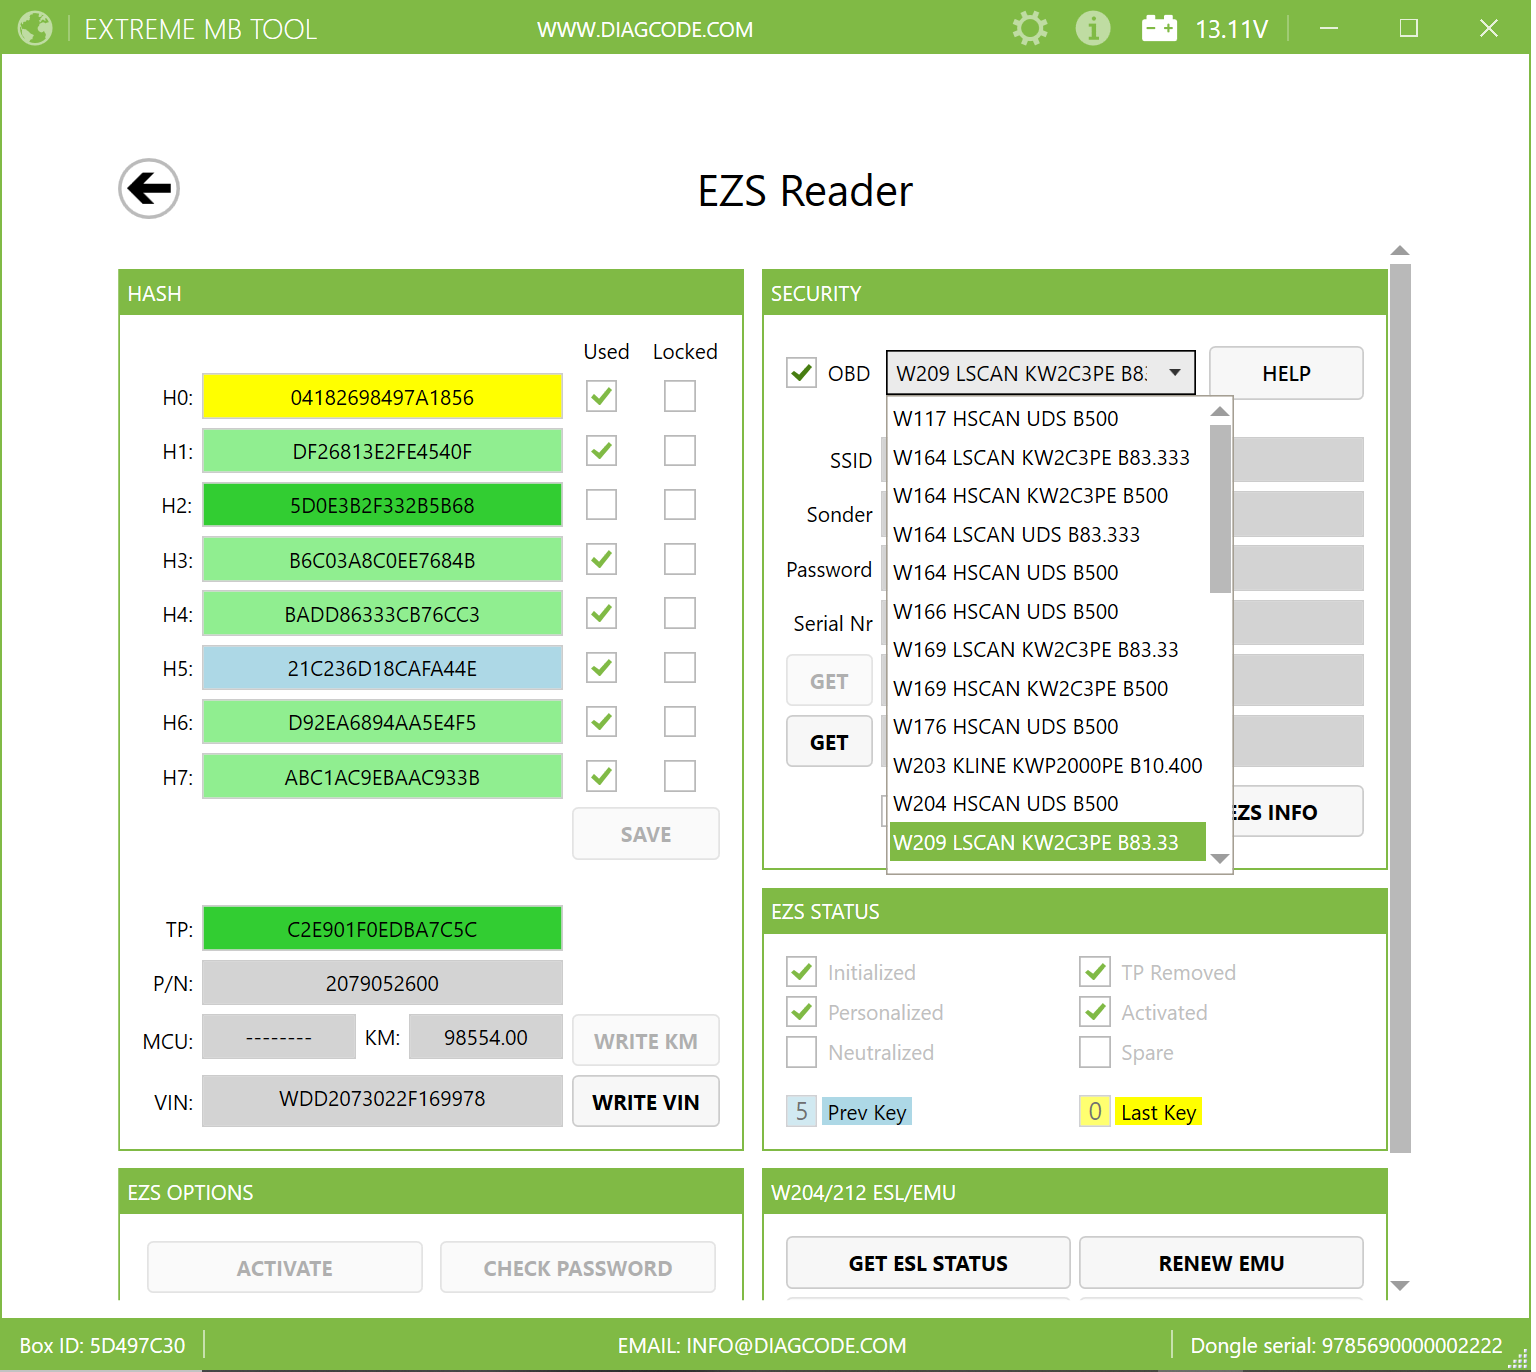
OBD Checkbox -> When this option is selected the program reads the EZS via its Diagnostic line ( Kline/Canbus ) User must connect a suitable J2534 device. More information on this can be found in section 6.

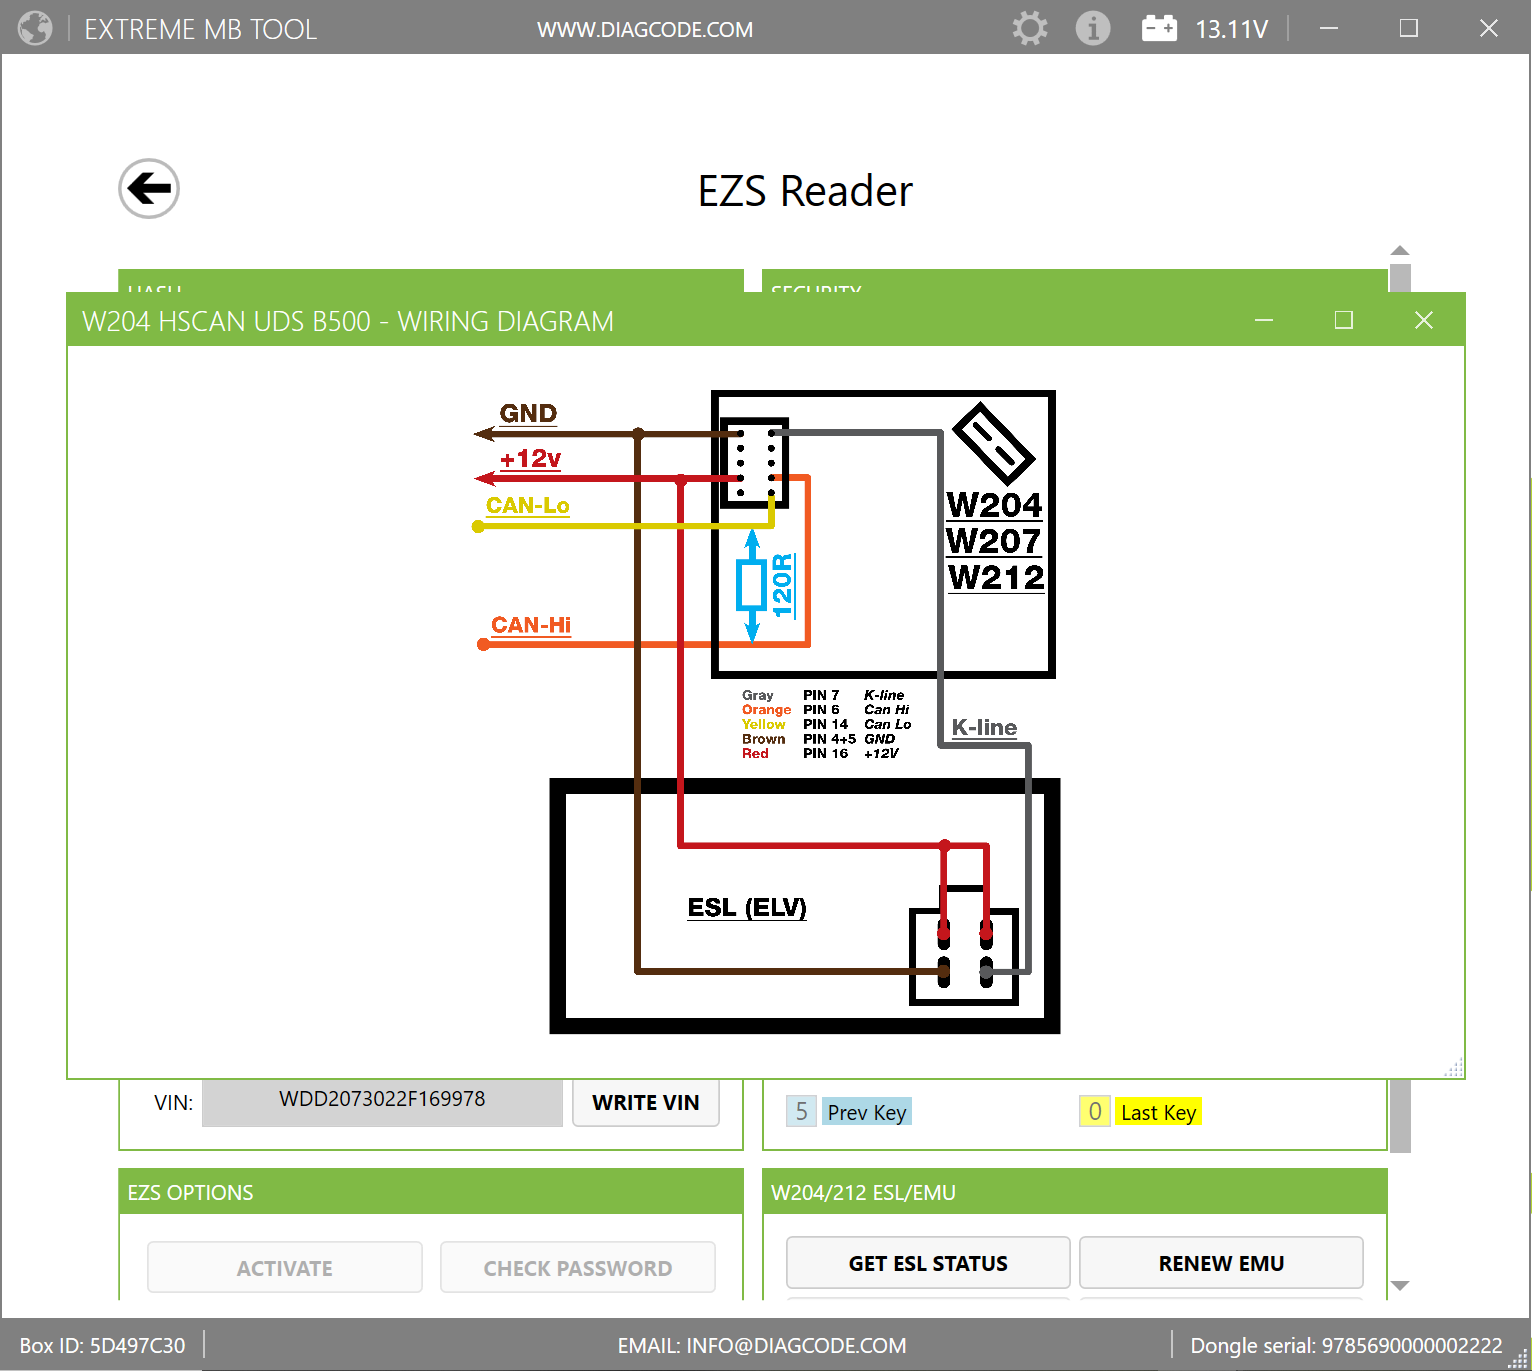
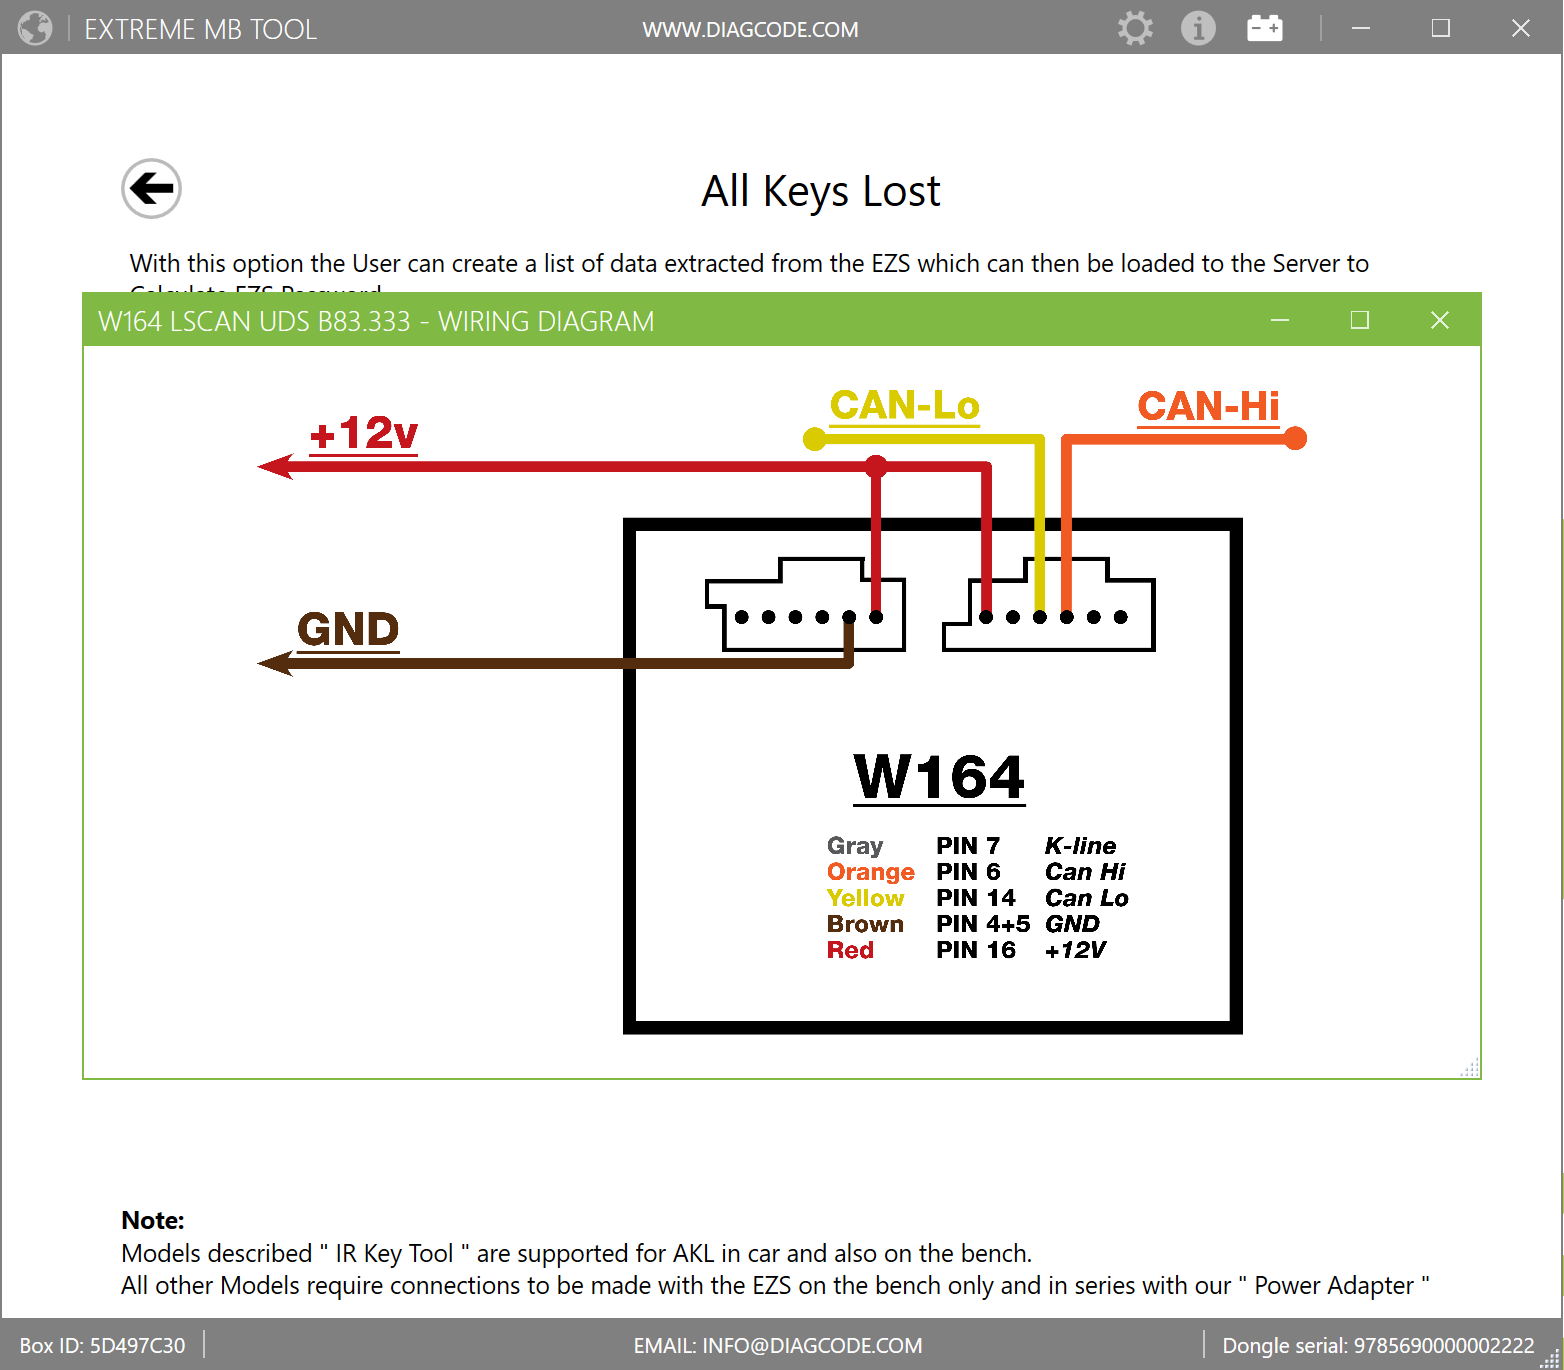
HELP Button -> Displays a detailed Wiring Diagram for the selected EZS. This enables the user to connect EZS on the bench efficiently.

- SSID -> This field displays the SSID of the EZS
- Sonder -> This field displays the EZS Sonder Hash. Sonder Hash can be called different names depending on the tool manufacturer. It is good to understand that Sonder/Special and Service Hash are all same, only different terminology. Same goes for Dealer Password and Erase Password. From the Sonder the User can calculate the Dealer Password needed to Renew EZS. Now with new software the User can simply click the " GET " Button to calculate the Dealer Password efficiently.
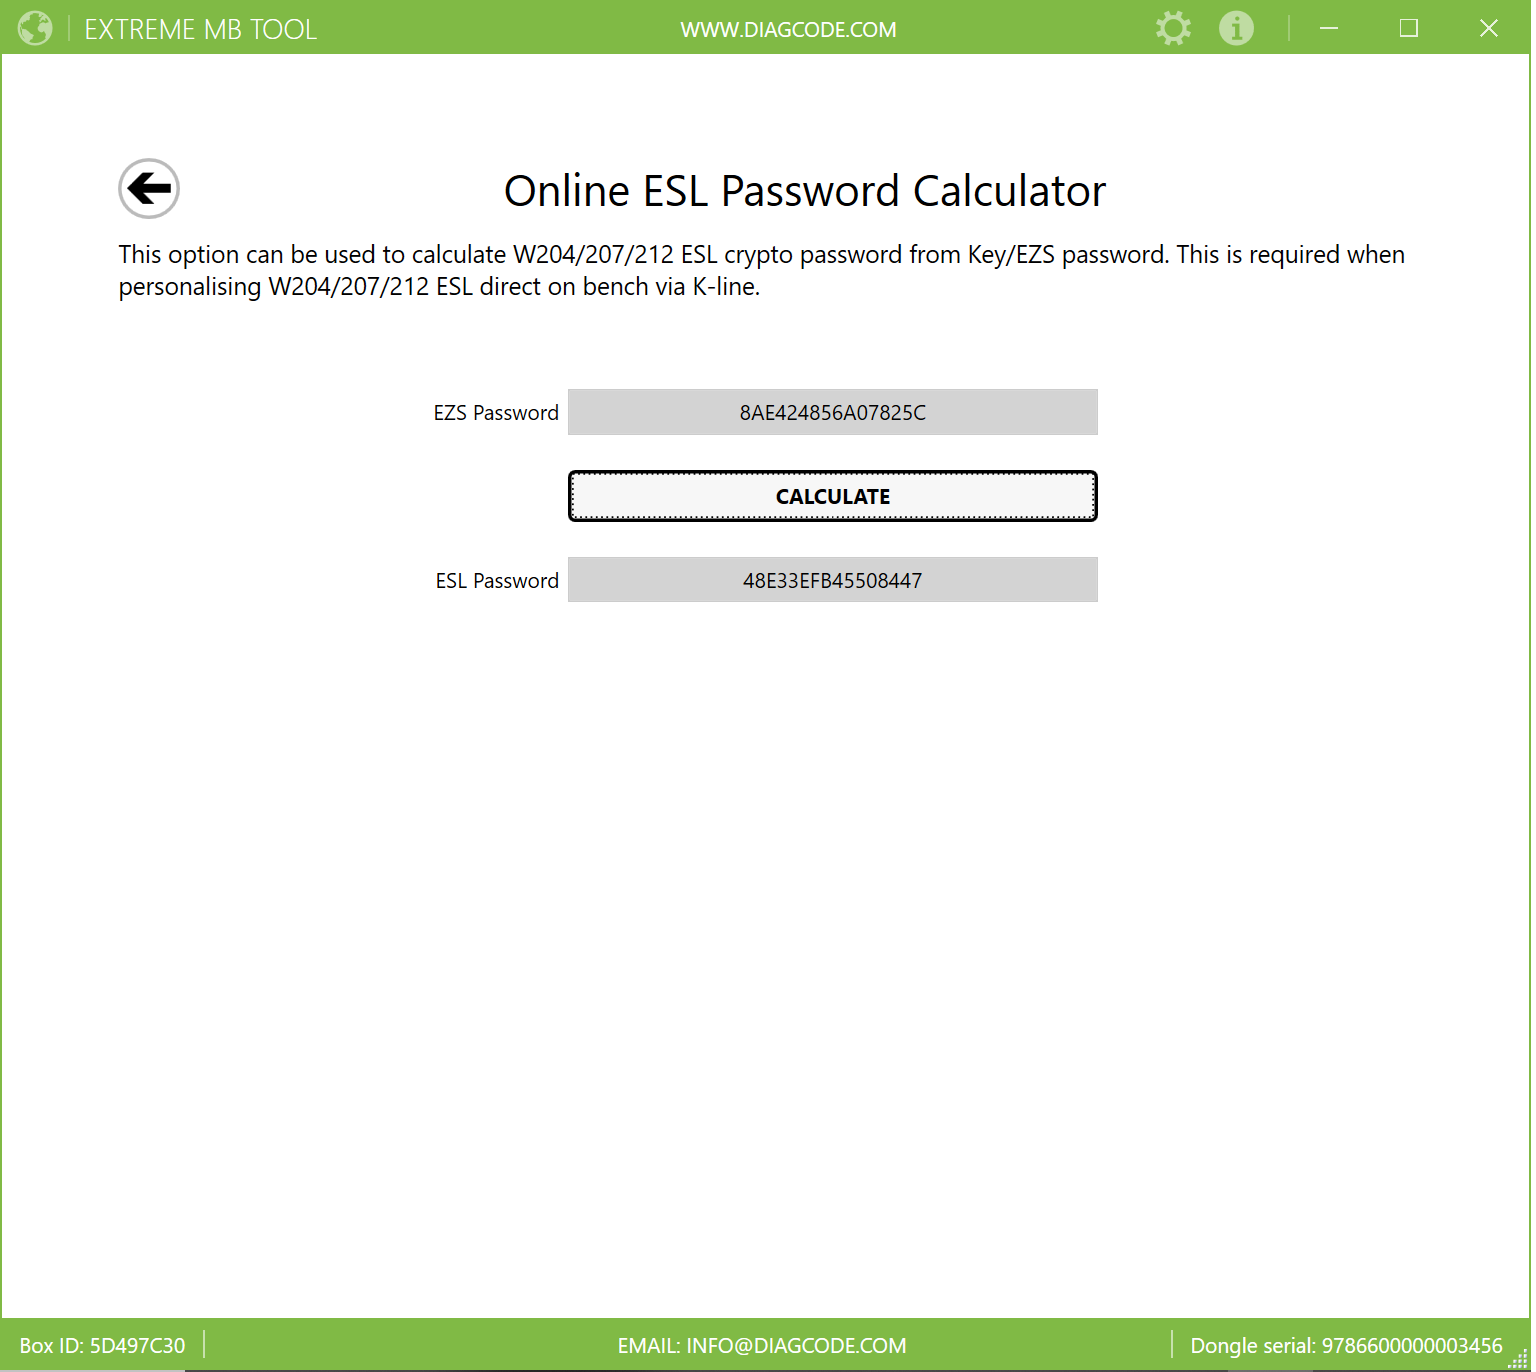
- Password -> This field displays the Password for the EZS, the Password is in fact the Crypto Mask used to encrypt the Data exchange between the Key and EZS. For correct operation the EZS and the Key must contain the same Password.
- Serial Nr -> This field displays the EZS Serial Number. This is a unique 16 digit Number for each individual EZS.  ( Note - Serial Number can not be Read via IR Portal on some types of EZS )
- ESL Password -> This field displays the Calculated ESL Password. This is derived from the EZS Password, meaning that the EZS Password must be present. With the New Software the User can Calculate this by simply clicking the " GET " button next to this field
- Dealer Password -> This field displays the Calculated Dealer Password. This is derived from the Sonder Hash, meaning that the Sonder Hash must be present. With the New Software the User can Calculate this by simply clicking the " GET " button next to this field

Type II -> For some different EZS types in order to read the data we have to select this option – this option is only needed for later NEC type EZS such as W117, 166, W176, 197, 212, 218 and 246


3. EZS STATUS Section: 

Initialized – EZS are initialized in factory
Personalized – EZS has been Personalized, meaning that FBS Data has been written inside (Hashes, SSID, Password... )
Neutralized – EZS has been Renewed sometime in the past using some tool. Usually this is the case when an EZS has been taken from another vehicle, Renewed, then re-adapted to match the current vehicle.
TP Removed – This is Transport Protection. TP must be removed before personalization process begins
Activated – This means EZS is Activated. When an EZS is "Activated" it can no longer be personalized
Spare – This tells us that the EZS is a “Spare Part” EZS                                                                                   

 “NOTE” There are 2 different types of EZS. 1.Series and 2.Spare. Series EZS are the original EZS that are installed during time of production inside Factory. Spare EZS are Replacement/Aftersales EZS
Last Key – The number indicates the last Keys Position Used. Last Key used Hash will be displayed in YELLOW color
Prev Key - The number indicates the previous Keys Position Used. Previous Key used Hash will be displayed in BLUE color


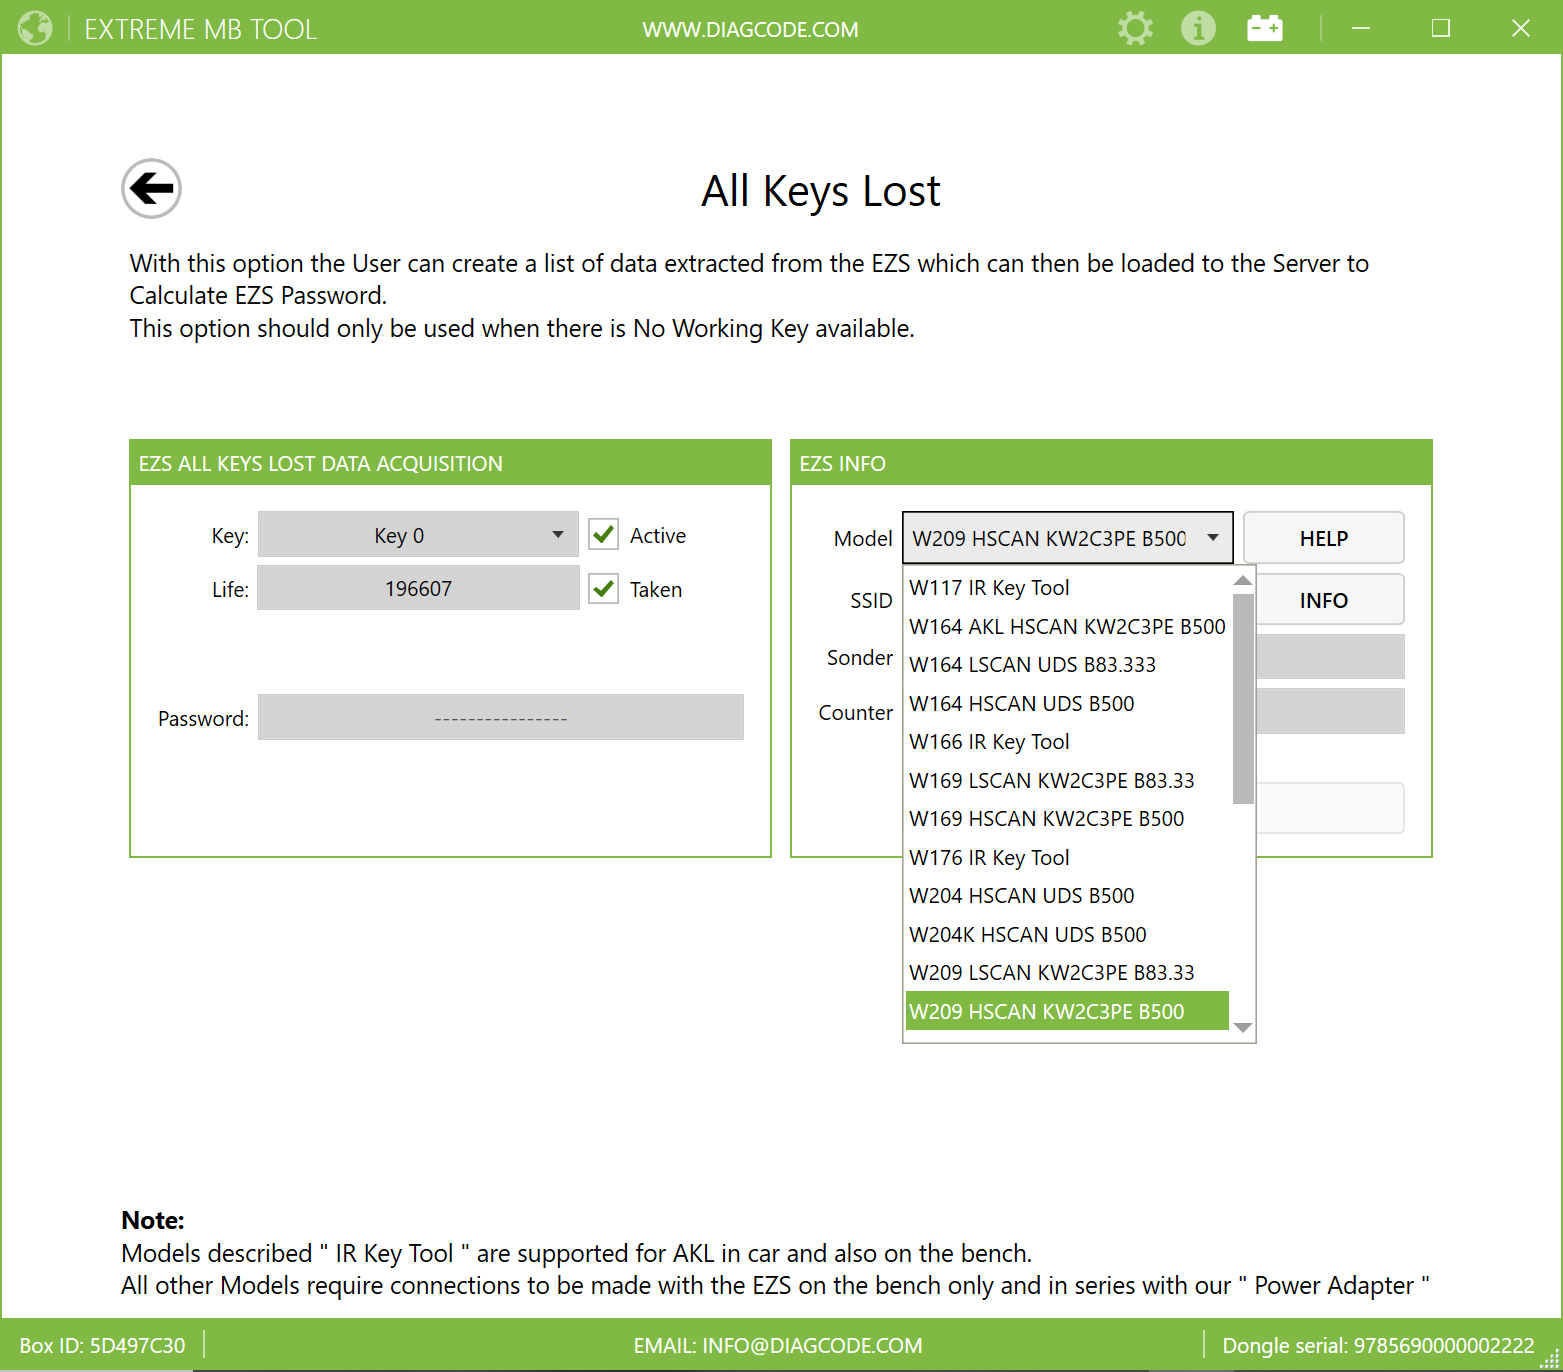
EZS READ Button -> We use this Button to “Read Data from EZS" When working on some EZS you will be prompted by the software to Re-insert IR KeyTool to EZS to complete the collection of data. Please follow the on screen instructions from Software. 

 EZS INFO Button -> We use this Button to Read the Security Data from EZS without reading all the Key Hashes. Only the EZS Status, SSID, Sonder and Serial Number are read when we use this Button.


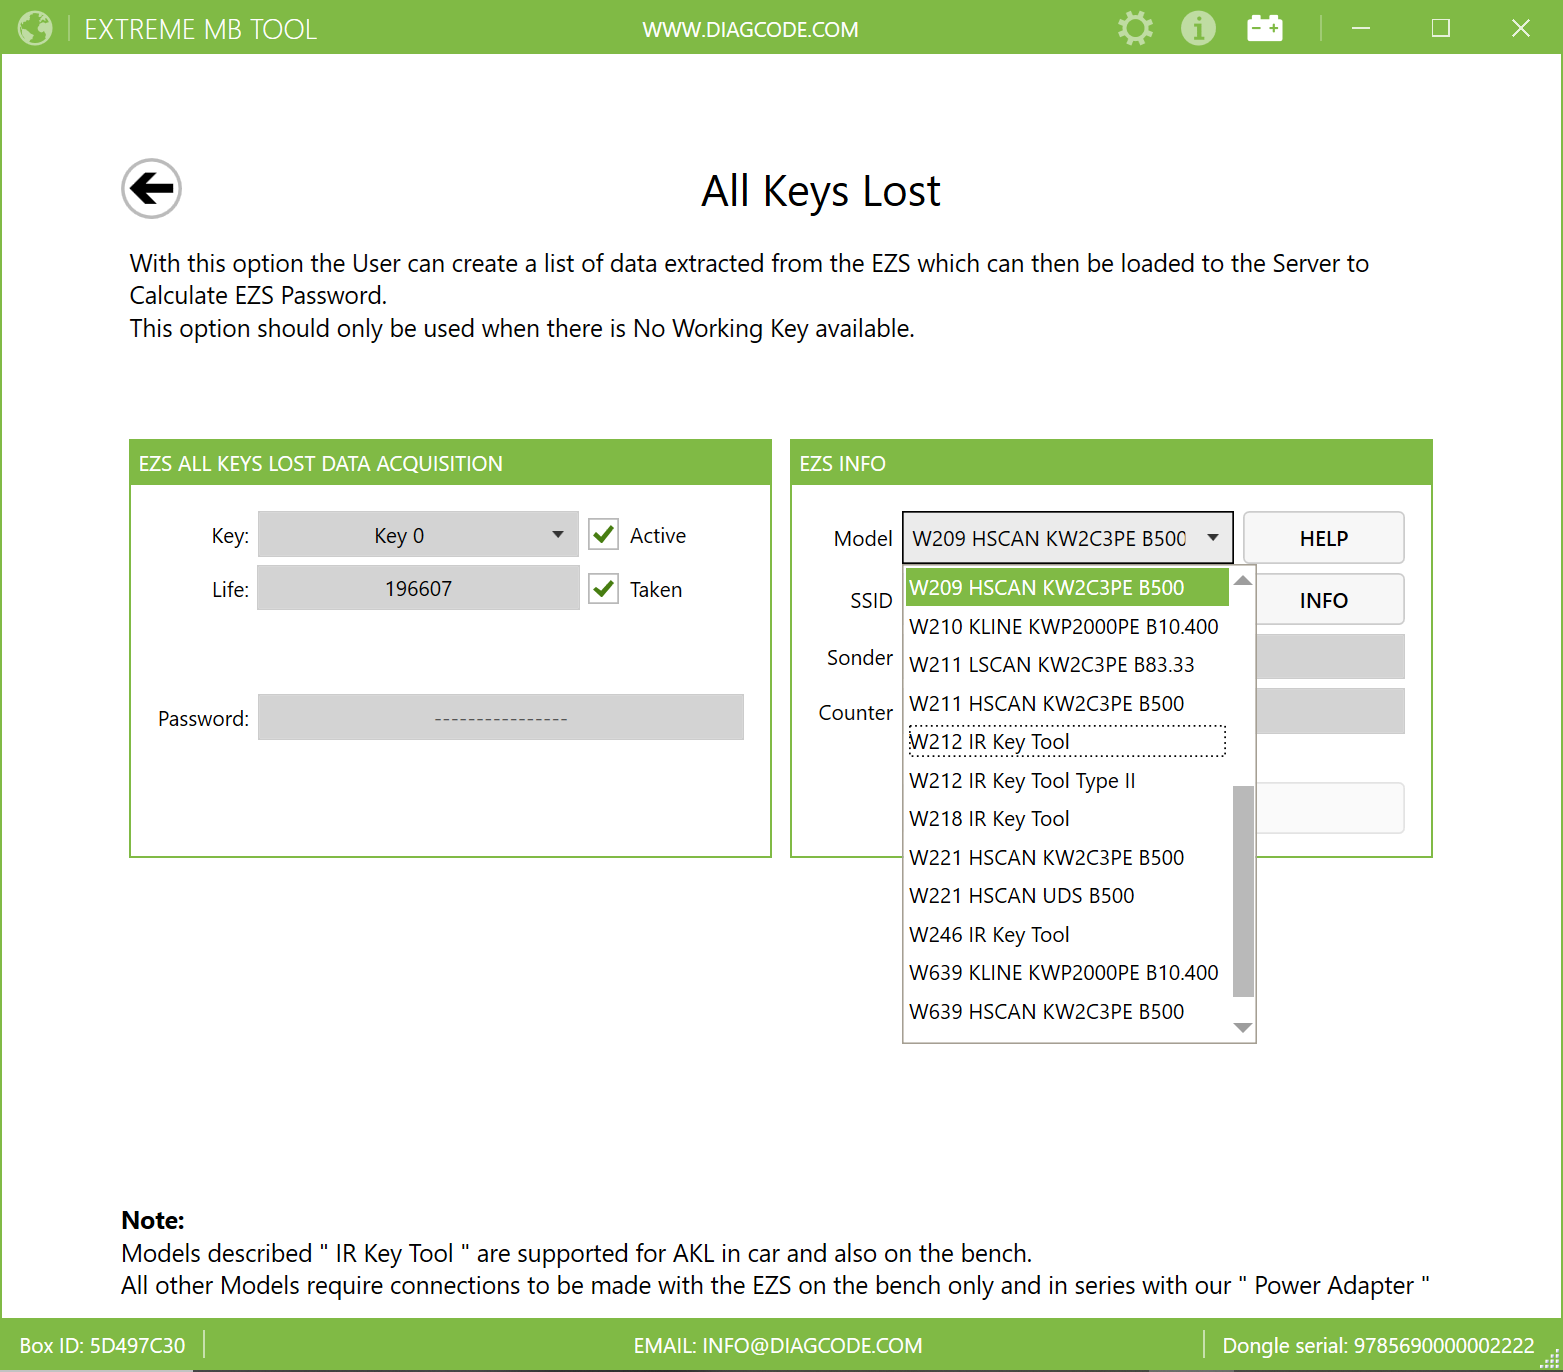
4. EZS OPTIONS Section:

ACTIVATE Button -> This Button is used to Activate the EZS. This function is very useful in specific situations when the User accidentally Renews some Dealer type EZS that can not be Personalized again. With this function it is possible to restore original functionality of the EZS.

CHECK PASSWORD Button -> Check Password – Used to verify if the Password inside the “Password” field is in fact a true match with the EZS

RENEW Button -> Used to Renew an EZS. This function resets the EZS to its default values, a common reason to use this function is when you need to install a used EZS into another vehicle, after the EZS is renewed the Vin is unlocked and can be re-written, also the current mileage stored inside the used EZS will get reset to zero when renewed. The “Activated” status will also get reset to a “Not Activated” state, meaning that it is now again possible to “Personalize” the used EZS with the personalization data of the vehicle that you are intending to install the used EZS into. To use this function successfully it is necessary to have the EZS Password and the Dealer Password in the fields provided within the Software. Now with new software the User can simply click the " GET " Button to calculate the Dealer Password efficiently.

PERSONALIZE Button -> This Button will Personalize a Neutralized EZS. The new software will automatically select the EZS type based on the status of the " Spare " flag.  When working with a Neutralized Spare status EZS, it is enough to insert the IR KeyTool in the EZS and the Personalization will commence immediately. When working with a Neutralized Series status EZS, it is essential to additionally Authorize Personalization with DAS / Xentry / Vediamo ...

LOAD FBS3 DUMP Button  -> We use this Button to load an FBS3 data dump ( .ezs file ) that was read / saved previously using EZS reader software

SAVE FBS3 DUMP Button -> We use this Button to save FBS3 data. The file will be saved in the old HC05 EZS Format with the extension .ezs


5. W204/212 ESL/EMU Section:

This section contains 4 Buttons 
GET ESL STATUS Button - Reads the Status of a real ESL via the EZS IR. Useful option to determine if a Real NEC ESL is 0xAA Blocked

RENEW EMU Button - When used with our Emulators this option can be used to Renew Emulator and set it back to the default “OLD mode”

PERSONALIZE ESL Button – This option is used to Personalize a real NEC type ESL or it can also be used to personalize any W204/212/176 ESL Emulator that supports the standard W204/212/176 ESL Personalization protocol. To successfully use this function you need the “EZS Password” and also the “Dealer Password” inserted inside the fields provided within the software. Now with new software the User can simply click the " GET " Button to calculate the Dealer Password efficiently. The only tool in the world that can Successfully Personalize and Activate a Renewed FBS3 ESL from - W176/117/246/156

PERSONALIZE EMU Button – This option is used to Personalize our Emulator. To successfully use this function you will need only to insert the “ESL password” into the field provided within the software. Now with new software the User can simply click the " GET " Button to calculate the Dealer Password efficiently

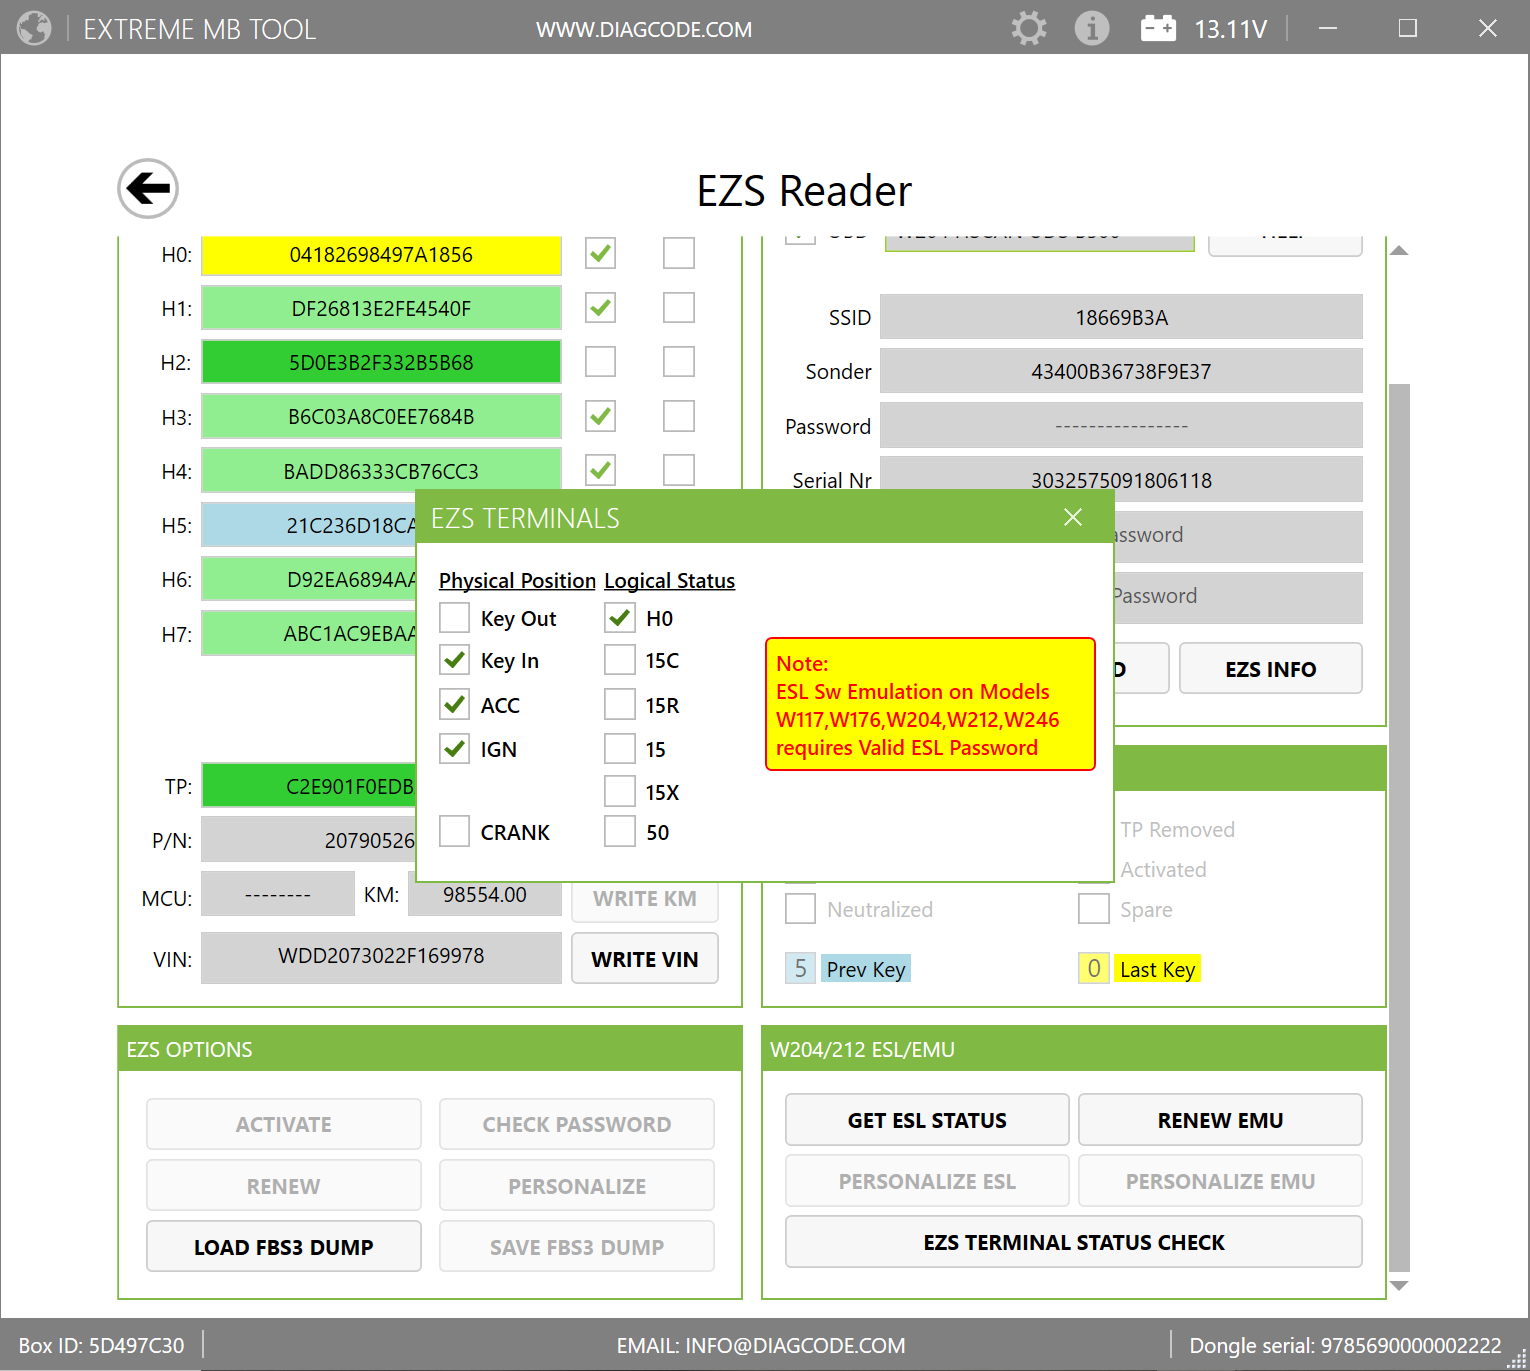
EZS TERMINAL CHECK Button - With this option the user can test the functionality of an EZS on the bench. Useful when user needs to check for correct operation / synchronization of an EZS / ESL / Emulator. The option also incorporates its own built in ESL Emulation function. This is useful when working on the bench without a real ESL or Emulator connected. ESL Emulation function also supports later ESL that require an ESL Password ( W204/212/176 ... ) 

EZS TERMINALS Dialog box:
Physical Position = Actual EZS Key Position
Logical Status = EZS Key Position Output Signal on the Can Bus

H0 = Key turned slightly ( before first position )
15C = Key inserted
15R = Key turned to Accessory ( First Position )
15 = Key turned to Ignition ON ( Second Position, remains ON during Crank )
15X = Key turned to Ignition ON ( Second Position, OFF during Crank )
50 = Crank ( Output for Starter Motor signal )


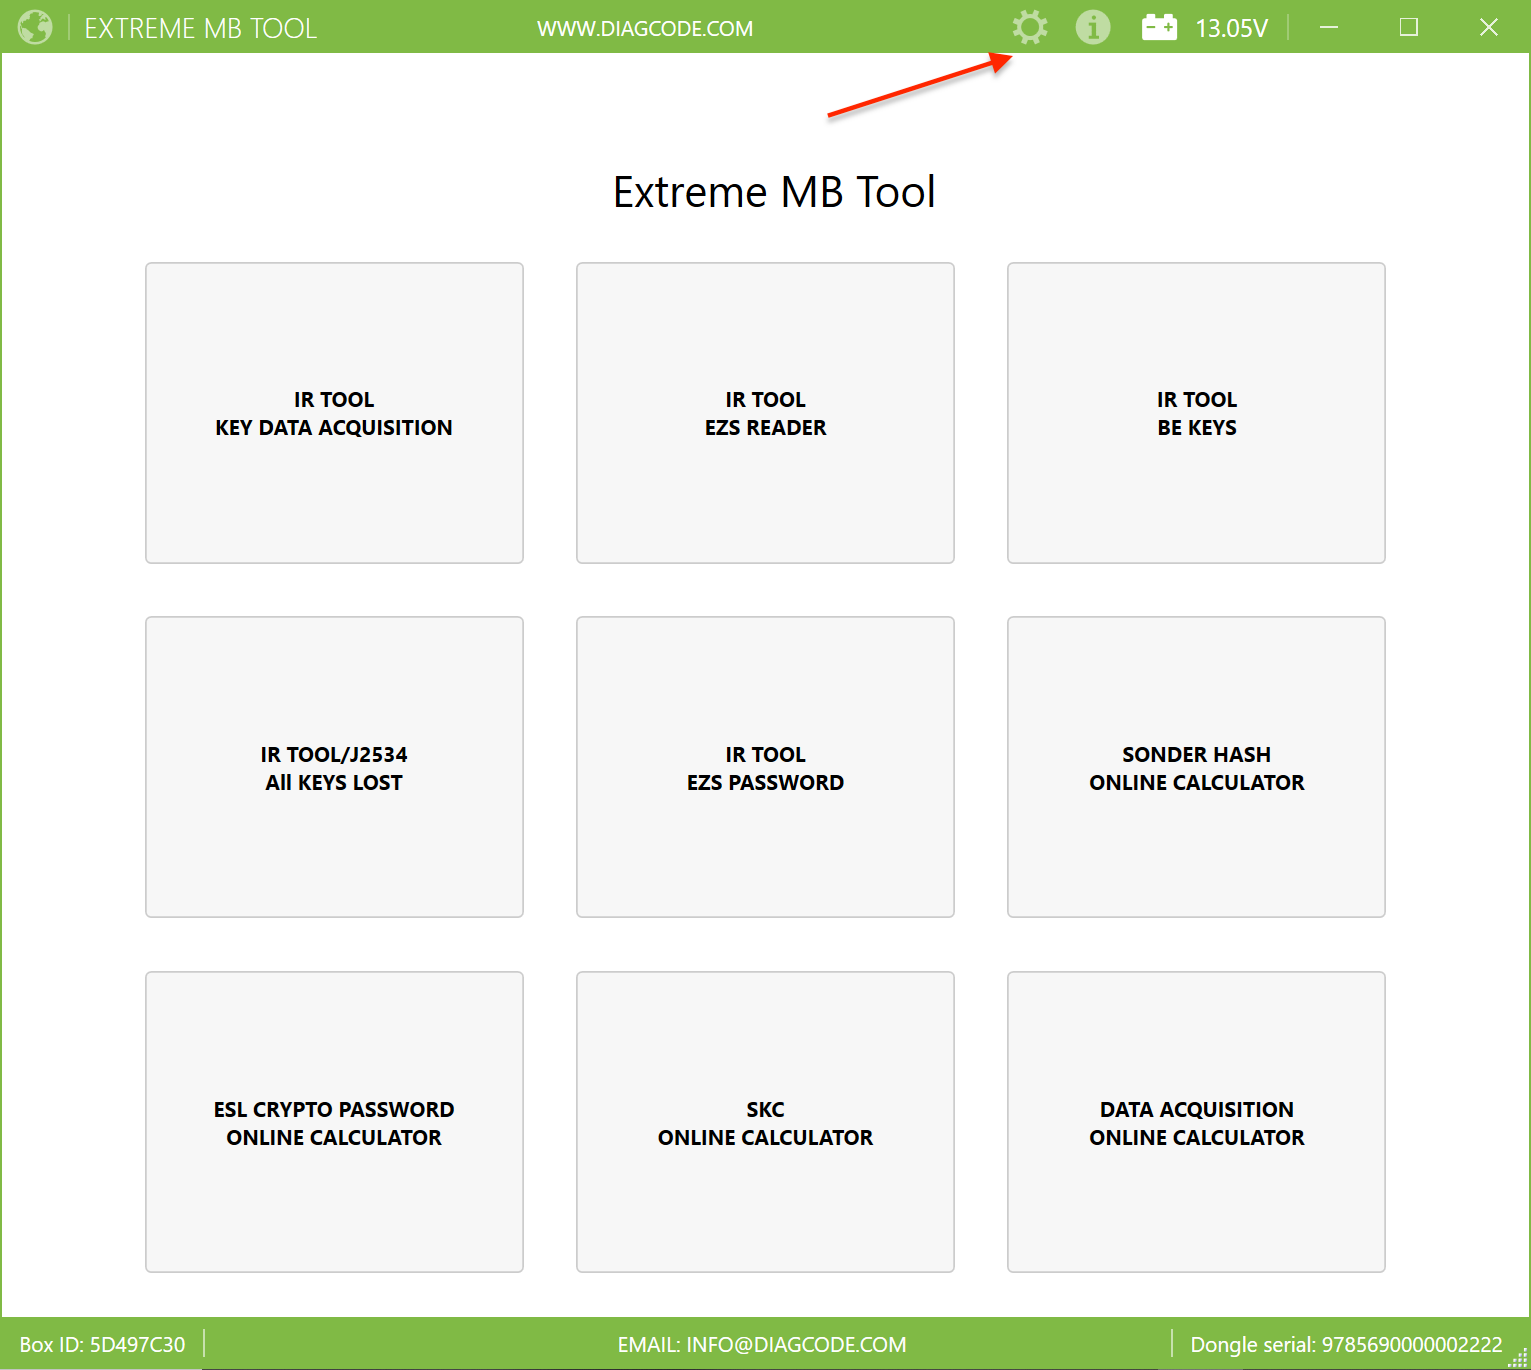
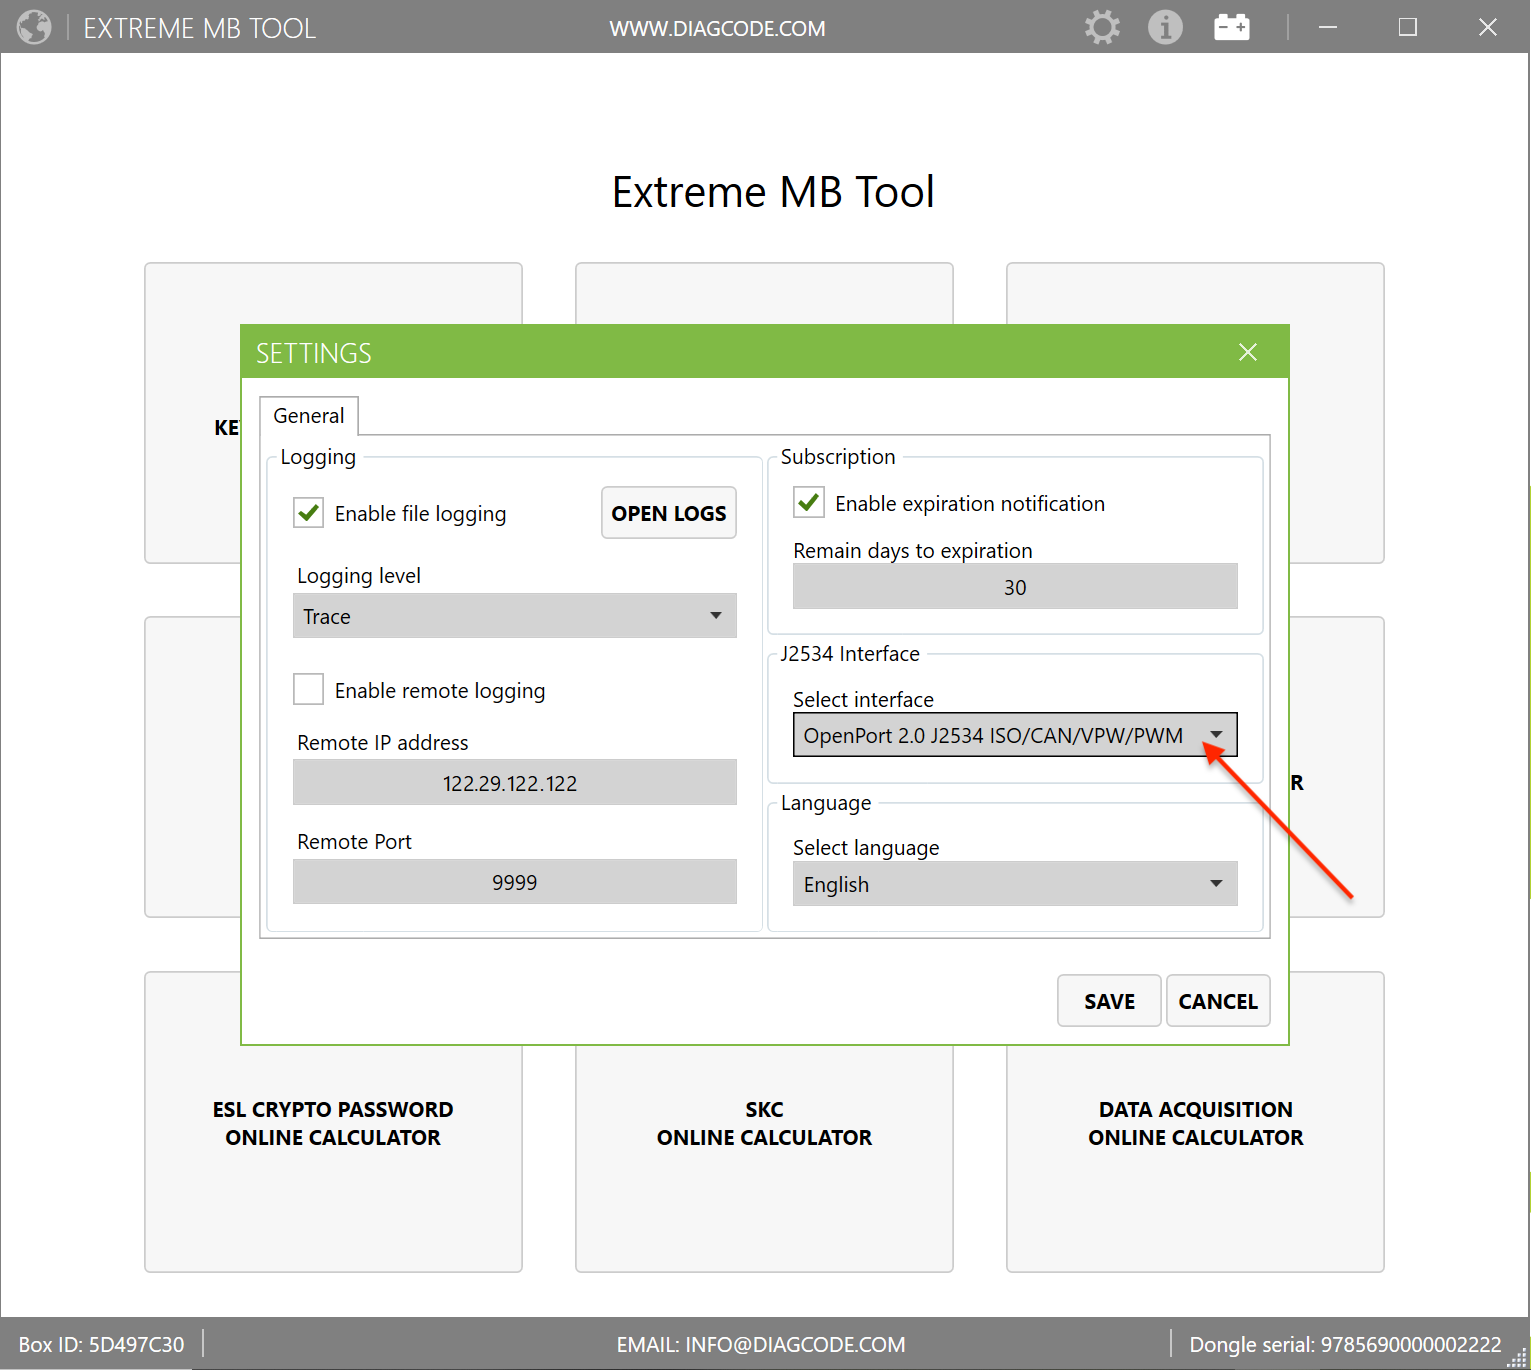
6. Working with compatible J2534 OBD device:
To use the OBD option the user must first install the drivers for their J2534 device. Next they must click the " Settings " option located on the top banner of the program and select their device from the list of installed J2534 devices. Finally, click " SAVE " 


  • ezs5.png
  • ezs6.png
  • ezs7.png

You can see the models supported for OBD reading in the list below: 

EZS Reader OBD Models

IR TOOL BE KEYS

With this option the User can Read, Write, Renew aftermarket Keys from various different manufactures. We also support the changing of the frequency on the X-Horse BE Keys

1.  KEY INFO Section :

READ Button -> By pressing the “Read” Button the User can read various information from the BE, EB, EA, A1 and other after market keys, such as the Key ID, Status, Firmware, Distance and remaining Life of the key.


2. KEY WRITE EEPROM Section :

WRITE Button -> When the User clicks the "Write" Button, they will be prompted to load the Key file to be written to the Key. At this point choose the Key file that you wish to use, click open and the software will Write the Key file to the Key. After writing the Key dump the software will ask you if you wish to "Activate Key" This option is here because when working with old HC05 EZS sometimes the after market keys will fail to activate in the EZS automatically. It is good practice to use the "Activate Key" option when preparing an after market key for one of these old HC05 type EZS.

Password Field -> Here is displayed the Key Password that was Written to the Keys Eeprom

Initial Hash -> Here is displayed the Initial Hash that was Written to the Keys Eeprom


3. KEY FREQUENCY Section :

For the X-Horse BE Keys we can also read and change the frequency of the remote control. The current Frequency mode is displayed when the User has Clicked the Read Button in the " KEY INFO " section. The User can then choose between the 3 different modes:
 - FRE  (Resistor controlled) 
- 315Mhz 
- 433Mhz
 Next, simply click the Button " SET " and this will SET the selected frequency mode of the Key.


4. KEY RENEW Section :

NORMAL Button -> This Button erases the Eeprom inside the Aftermarket Keys to all Zeros, Resulting in Status " 0000 " This Status is also known as " Key Prepared for Normal Write" 

CRYPTO Button -> This Button sets the Status of the Aftermarket Keys to " 21DF " This Status is also known as " Key Prepared for Crypto Write "


5. KEY READ EEPROM Section :

READ Button -> When the User clicks the "READ" Button the software will read the Eeprom from the Aftermarket Key. When the reading completes the software will prompt the User to save the file. 

Password Field -> Here is displayed the Key Password that was Read from the Keys Eeprom

Initial Hash -> Here is displayed the Initial Hash that was Read from the Keys Eeprom


IR TOOL/J2534 ALL KEYS LOST

With this option the User can create a list of data extracted from the EZS which can then be loaded to the Server to Calculate EZS Password. This option should only be used when there is No Working Key available.

1. EZS ALL KEYS LOST DATA ACQUISITION Section:

This field displays the values for the emulated Key and will also display the password when found.

NOTE!!! 
We have took steps to automate this selection, meaning that in normal situations the user does not need to change these default settings at all.

- Key -> This is the actual Key that we emulate during the AKL process. 

- Life -> The life counter of the emulated Key

- Active -> When checked this means the emulated Key is " Activated "

- Taken -> When checked this means the life counter derements on each authentication

- Password -> This field is where the Found Password is displayed


2. EZS INFO Section:

- Model -> Use the dropdown tab to choose the correct model ( a full list of supported models for AKL can be found below )

- SSID -> This field displays the SSID of the EZS

- Sonder ->  This field displays the EZS Sonder Hash

- Counter -> The number of Hashes gathered from the EZS ( 1 list contains 1024 )


HELP Button -> Displays a detailed Wiring Diagram for the selected EZS. Please note, Models described " IR Key Tool " are supported for AKL in car and also on the bench. All other Models require connections to be made with the EZS on the bench only and in series with our " Power Adapter "


INFO Button -> Reads the SSID and Sonder Hash from EZS using IR Key Tool


ALL KEYS LOST Button -> This will start gathering data from EZS that will be saved as a list file. The file is used to calculate the EZS Password on Server


  • akl2.png
  • akl3.png
  • akl4.png
  • akl5.png
  • akl6.png
  • calcpassok.png

A full list of supported models for AKL can be found below

AKL2 MODELS

IR TOOL EZS PASSWORD

With this option the User can Read Password direct from EZS via IR. This is an offline process and requires approximately 50 seconds to obtain the Password from HC12 types and up to 3 minutes to obtain the Password from the HC908 types. The Function supports Old Motorola EZS with MCU's HC908 and HC12 inside EG: Some W203, W463, W209, W211, W215. Not support HC05, ST12 or ZGW types..

1. GO Button -> This will start the process of reading the EZS Password Via the IR Portal. 

2.  Password -> This is the actual “True” EZS Password calculated and checked by our software, because we check the Password before it is displayed inside this field you can be 100% sure that it is a match with the EZS.


SONDER HASH ONLINE CALCULATOR


With this option the User can calculate the “Dealer Password” needed for the Neutralization of FBS3 components - EZS, ESL, 7G, ISM, ECU …


ESL PASSWORD ONLINE CALCULATOR


With this option the User can calculate the "Crypto ESL Password" from KEY/EZS Password. Suitable for models W204/207/212


SKC ONLINE CALCULATOR


With this option the User can calculate the Key Dump files to be written to the Keys. The User can load an FBS3 Data Dump read via IR from the EZS, or they can load a file from the EZS that has been read with any suitable programmer.


DATA ACQUISITION ONLINE CALCULATOR

With this option the User can calculate the FBS3 Password from a list of data collected from either the EZS or the Working Key.


Customers with a valid annual subscription can use the software to calculate passwords for FREE. There are no TOKENS. There are limits for using each of the functions, but these limits are more than enough even for professional workshops:

3 FREE daily calculations for Sonderhash calculations (Dealer Hash)

3 FREE daily calculations for ESL Password Calculation

3 FREE daily calculations for calculation of key files from EZS dump

3 FREE daily calculations for EZS Password Calculation